Vanderbilt News Feeds for RSS Reader Blocks
A great website not only has compelling images and original content, but also ever-changing content. You're more likely to increase your returning visitor rate by having content that is fresh and up-to-date. One way to do this is to create a blog on your site. This can be department news, VUMC news, or perhaps a specific area of medicine. The key to blogging is to do it consistently, so what if you don't have time? That's where the VUMC News feeds come in handy!
What are VUMC News feeds?
Did you know that content featured in VUMC News is tagged? Not only that, but each tag has its own feed! What does this mean for you? It means an ever-changing, updating stream of news that you can add to your website and it maintains itself. For those of you that don't have time (or enough content) to start a blog, you can still implement a news-style block on your website.
How do I find available feeds from VUMC News?
Lucky for us, VUMC News has a list of tags and their feeds. You can view this list at http://news.vumc.org/subscribe/available-feeds/ Most likely you'll find your department feed and probably a few other feeds that would make sense to show on your website.
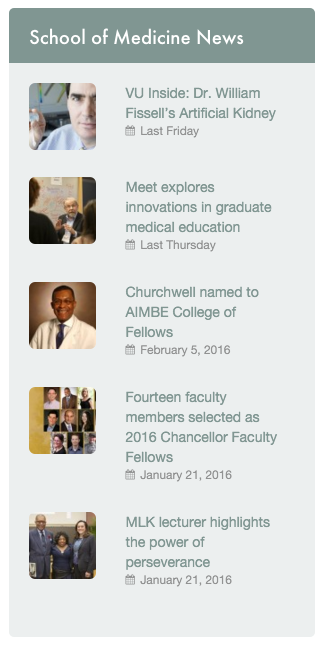
As an example, here is the School of Medicine listing.
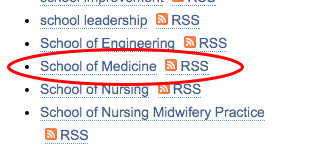
You'll find two links for every listing. The first link (in this case the text "School of Medicine") will take you to the page on VUMC News where you can view all the stories tagged School of Medicine, newest listed first. The link for this is http://news.vumc.org/tag/school-of-medicine/. Add "feed" to the end of this URL (http://news.vumc.org/tag/school-of-medicine/feed). This will be the link used to create an RSS block in Barista.
How do I create an RSS block using the Vanderbilt News feeds?
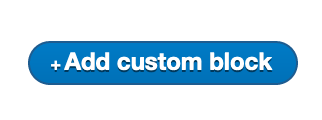
Now that you have your feed URL, you can create an RSS block. Select "Blocks" from the top black admin bar. Next select the blue "Add Custom Block" button.
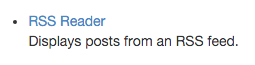
Select "RSS Reader" for the type of block.
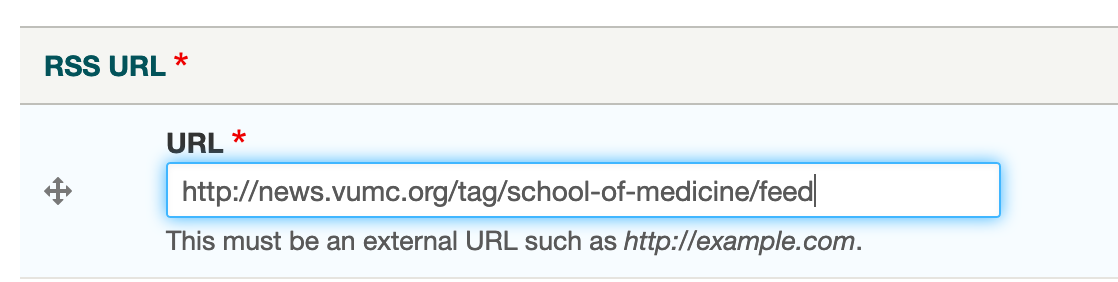
On the next screen will be your settings. Create a label to identify the block in your block listing. The title is optional, but can be something like "School of Medicine News." In the RSS URL field, you'll want to add your feed URL. You can add multiple feed URLs into one block and the feeds will be merged and sorted by date. Alternatively you can create multiple RSS blocks and display the feeds separately.
Select the rest of the block settings according to your preferences and save the block. Place the RSS block on a page by editing the desired page and checking the box next to your newly created RSS block.
Now your site has a news area that will update automatically every time a new story is published with your specific tag. Easy to maintain and you're providing your readers with ever-changing, up-to-date content.
Faculty Database Integration with Barista
It's now easier to create directory pages in Barista with our integration with the Faculty Database. Instead of manually creating a Person Page for each faculty member, you can now import their data from the Faculty Database. Not only does this save time, but it keeps information accurate across several websites since it's coming from one source.
What is the Faculty Database?
The Faculty Database is where profile information on each School of Medicine faculty is stored and managed. Faculty (and their delegates) can maintain their profile through this database. The information from the database can then be viewed through other websites such as those on the Barista platform and School of Medicine Faculty Profiles.
How do I use the Faculty Database in Barista?
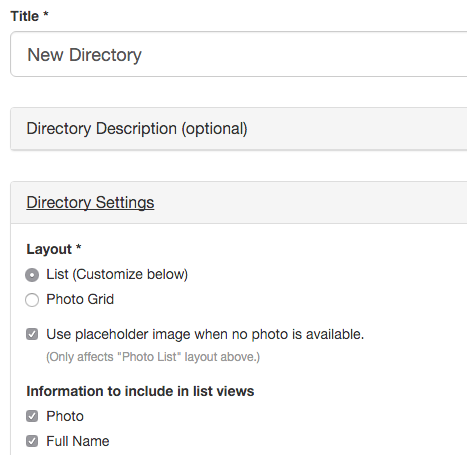
First, select Person Directory Page from the Create Content dropdown in the top black administration bar. Give your new directory a title and select your preferred layout options under Directory Settings.
The People to Display section is where you will manage information that pulls from the Faculty Database.
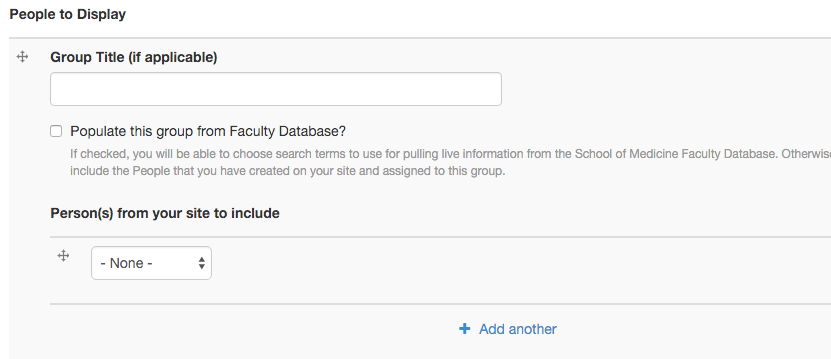
Group Title - This field is optional, but you can use it to group people on your directory into categories. For instance, if you wanted to separate primary and secondary faculty, you could name them accordingly here.
Populate this group from Faculty Database - Check this box to pull information from the Faculty Database. Once you check this box, you will be able to use search terms from the database to populate your directory. Learn more on this in the Populating from the Faculty Database section below.
Person(s) from your site to include - In this section you'll find a dropdown where you can select People Pages you've already created manually on your site. This is useful if you want to include people in your directory who are not in the Faculty Database. You must create the Person Page first, and then you can add them to your directory in this section. Select the blue "add another" option to continue to add manually-created person pages to your directory.
TIP To remove a person page from your directory, simply change their dropdown field to "none" and save the directory page.
IMPORTANT Manual sorting is not applicable to groups containing results from the Faculty Database. Manual sorting applies to directories containing only manually-created person pages.
Remove this directory group - This will delete the entire directory group from your directory page.
Add another directory group - This will add another directory group to your directory page.
Populating from the Faculty Database
Once you check the box to use the Faculty Database integration, you will see a few search options.
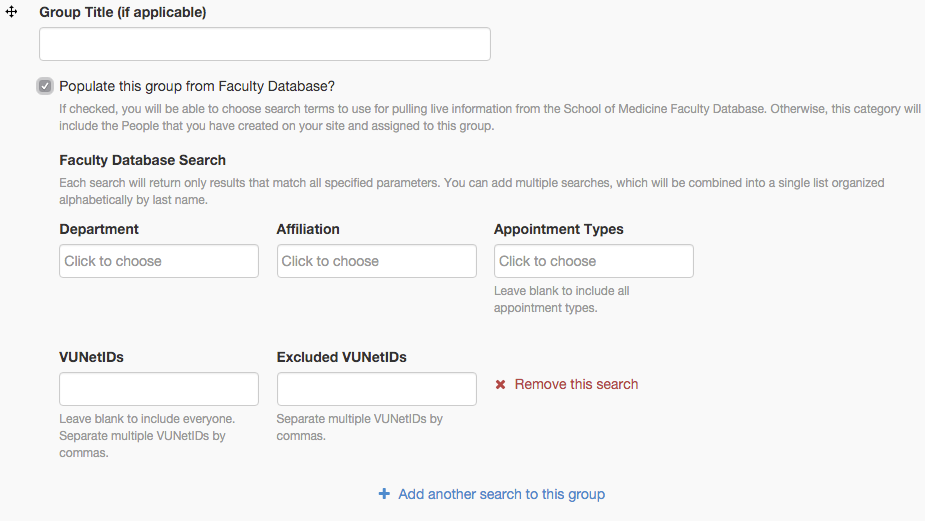
Department - This field is required. Choose the department from which you want to search for faculty. You can choose multiple departments at a time in this field. To remove a department, select the "x" next to the department name.
Affiliation - An affiliation is a group that can be made of faculty across several departments. For example, you may want to include faculty that are part of a center or program.
Appointment Types - Select the appointment type. Leave this field blank to include all appointment types. You can choose multiple appointment types at a time in this field. To remove an appointment type, select the "x" next to the appointment type name.
VUNetIDs - Enter the specific VUNetIDs of those faculty you want to include (if you don't want to include everyone). Leave this field blank if you want to include everyone. You can add multiple VUNetIDs at a time by separating the VUNetIDs with commas. Please note, the Faculty Database uses VUnetID, not VUMCnetID.
Excluded VUNetIDs - Enter the specific VUNetIDs of those faculty you want to exclude from the search. You can add multiple VUNetIDs at a time by separating the VUNetIDs with commas.
Remove this search - The red "x" at the end of the row of search fields will remove the search criteria.
Add another search to this group - This will add another search to your group.
What if information from the Faculty Database needs to be updated?
Faculty (and their delegates) can maintain their profile through the database. Faculty information from the Faculty Database cannot be updated through Barista. To update information, faculty can log in to the Faculty Database. Once logged in, faculty can assign delegates to access their profiles. Delegates will then have access to update that faculty member's information in the database.
What if I need to update my profile picture?
Faculty (and their delegates) can update their profile pictures through the Faculty Database. Profile pictures cannot be updated through Barista. Log in to the Faculty Database to update your profile picture.
What if I used to have access as a delegate, but I don’t anymore?
Faculty can assign individual delegates to their profiles by logging in to the Faculty Database. Once logged in, faculty can assign delegates to access their profiles.
How to Use the Summary Option on a Blog
What is the Summary option and why should I use it?
If you use the built-in blog feature in Barista, you've probably noticed that you have two options of how to show your posts on the blog page. One is to show the full post and the second is to show a teaser of each post. Showing a teaser of each post is a great option, because it eliminates a lot of scrolling and your readers are likely to stay on your blog longer if they can quickly see your posts.
However, if you choose to use the teaser option, you'll find it doesn't appear as clean. Different image sizes, font sizes, and font styles for each post can make your blog hard to read. This is where using the Summary option comes in handy!
The Summary field allows you to write a short sentence or two summarizing what your post is about. When you use the Summary option, the blog page will show your short summary instead of a teaser, and your blog page will look much cleaner.
Where can I find the Summary option?
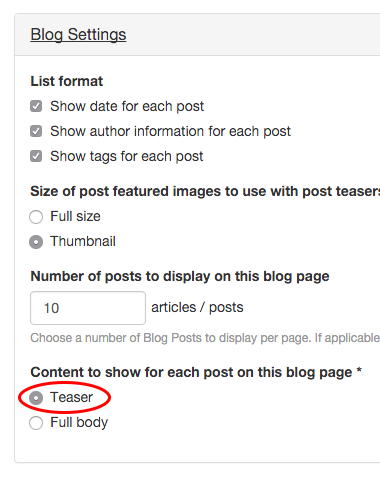
Each time you write a post, you have the option to use the Summary field. You can also go back to older posts and add a Summary. For the Summary option to work, you must set your blog to show "Teaser" under the Blog Settings menu in edit mode.
In edit mode for a post, scroll down just a bit until you see the Body area with the text editor. You should see Body (Edit summary). Select the "Edit summary" link.
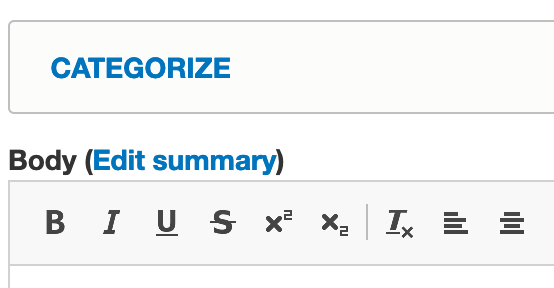
A new Summary box with a text editor will show above the Body box. This is where you will type your summary text. I usually write my post first, then go back to this area and summarize it. You can select "Hide summary" if you want to close this box. Hiding the summary will not remove the text you typed.
Once you've created your summaries for each post, you'll see your blog page appears much cleaner and shorter. This WAG blog is an example of a blog that uses the Summary option for each post.
How to Create Content Behind VUNetID
Barista has a built-in feature allowing content editors to restrict viewing access on any type of content and it's extremely easy to use. You will have two options with access control.
Anyone with a VUNetID
The first level of access control is restricting viewing to anyone with a VUNetID. This means exactly that. Anyone with a VUNetID can log in and view the content on your restricted page.
To implement this feature, edit the page you want to put behind VUNetID and expand the Access Control box to the right.
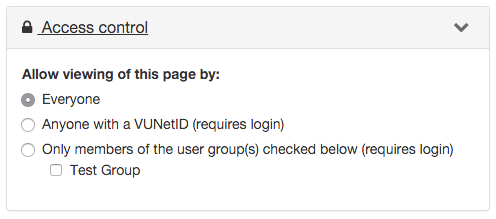
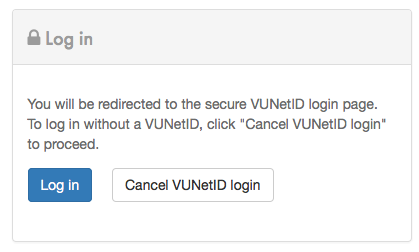
By default, Everyone is selected. This means your page is public. Change the access control to Anyone with a VUNetID and then save your page. Now, when someone visits this page on your site, they'll see the login below. They can view the contents on the page by logging in with their VUNetID.
If this page is in your navigation menu, a lock icon will show next to the page title, signaling that a login is required.
Specific VUNetIDs
You may want to restrict access to pages on your site even further. Perhaps you don't want everyone with a VUNetID to access your content, but only specific people with VUNetIDs. This is easy to do in Barista, but has a few more steps than the previous option.
The first step is to create a group. This group will contain the VUNetIDs of the specific people you want to be able to access your content.
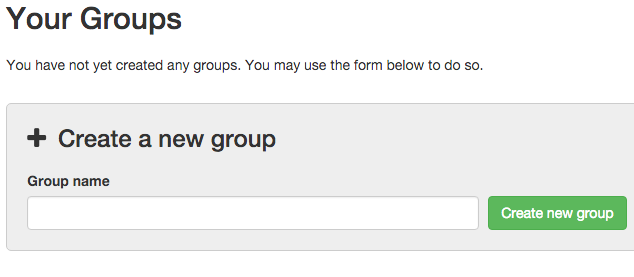
Creating a Group
To create a group, go to the Users section in the top black admin bar. Scroll down to the Your Groups section. Enter a name for your group and select the green "Create new group" button. You will not be able to edit the name later, but you can delete a group. For this example, our group name is Test Group.
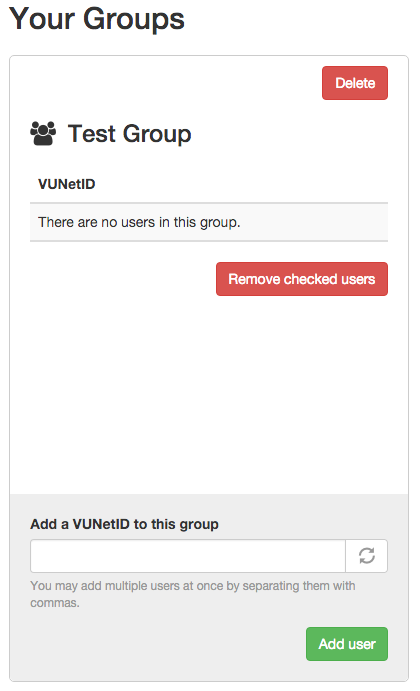
Next add the specific VUNetIDs of those that belong in the group and select the green “Add user” button. You can remove members from a group by checking the box to the left of the VUNetID you want to remove and select the red “Remove checked users” button.
Deleting a Group
To delete a group, select the red “Delete” button in the top right corner of the group area.
Assigning a Group to a Page
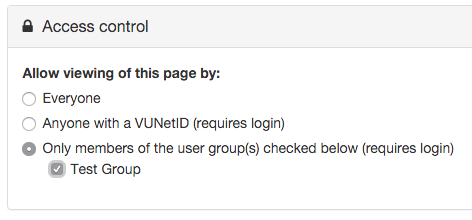
To use the Group feature, create a page or edit an existing page on your site. Expand the Access Control area in the right sidebar. Select the “Only members of the user group(s) checked below” option, then check the box next to the user group. The group you created should show here. This will lock down the page to only allow those in the user group to view it. Content Editors will always be able to view any page on the site and do not need to be added to the user group(s).
How to Manage Users in Barista
Viewing Content Editors
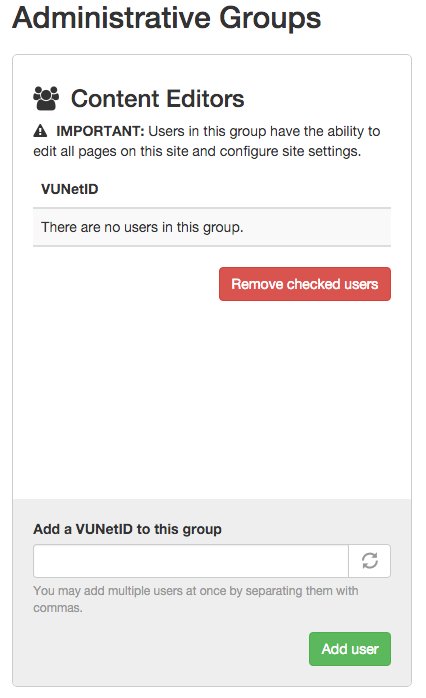
If you're already a content editor on a Barista site, you can add and remove other content editors. To view a list of your site's current content editors, select Users from the top black admin bar. In the Users section, you'll see a box for Content Editors. This is where you'll find a list of VUNetIDs of all the Content Editors on your site.
Adding Content Editors
IMPORTANT Keep in mind that all Content Editors have the ability to edit all pages on the site and configure site settings.
To add a Content Editor, type their VUNetID in the “Add a VUNetID to this group” box. Select the green “Add user” button. You may add multiple users at once by separating their VUNetIDs with commas.
Removing Content Editors
To remove a Content Editor, check the box to the left of the VUNetID you want to remove. Select the red “Remove checked users” button.
Managing Groups
In the Users section, you can also create specific groups of VUNetIDs. This is helpful when you want to protect a page beyond everyone who has a VUNetID. This will allow you to grant access to a page on your site to a specific group of people. They will not have access to edit your site, only to view what you lock down.
Creating Groups
To create a group, enter a name for your group and select the green "Create new group" button. You will not be able to edit the name later, but you can delete a group. For this example, our group name is Test Group.
Next add the specific VUNetIDs of those that belong in the group and select the green “Add user” button. You can remove members from a group by checking the box to the left of the VUNetID you want to remove and select the red “Remove checked users” button.
Deleting a Group
To delete a group, select the red “Delete” button in the top right corner of the group area.
Assigning a Group to a Page
To use the Group feature, create a page or edit an existing page on your site. Expand the Access Control area in the right sidebar. Select the “Only members of the user group(s) checked below” option, then check the box next to the user group. The group you created should show here. This will lock down the page to only allow those in the user group to view it. Content Editors will always be able to view any page on the site and do not need to be added to the user group(s).
How to Create Links on Pages
How do I link text to a page on my site?
Type the text you want to link. Highlight that text and select the "Link" button. 
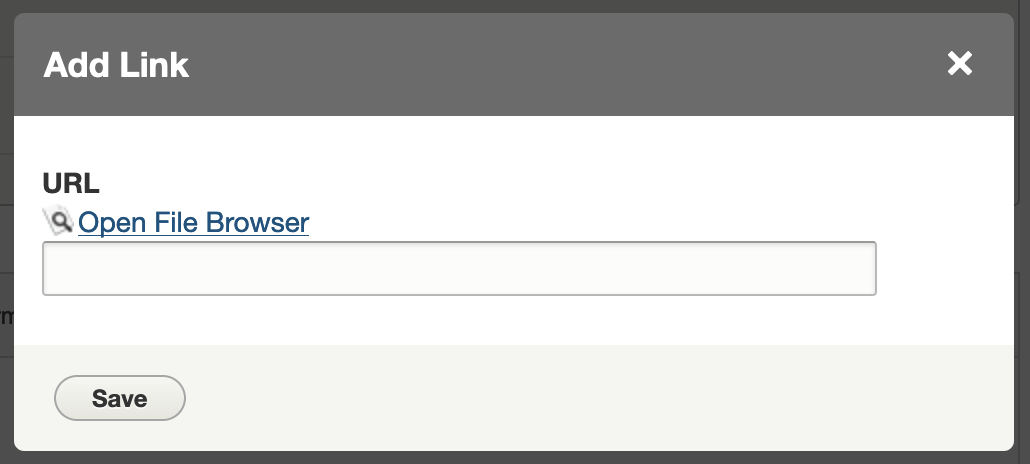
The "Add Link" window will open with two options, linking to a File, or a URL.
How to create a website link
Once the "Add Link" box is open, enter the URL of the website or webpage the text should link to and click the "Save" button. The URL can be either to another website, or another page within your website.
How to create a link to a file or document
Once the "Add Link" box is open, click the "Open File Browser" link. This opens the file browser for the website, allowing you to find the file needed or upload a new file for the link.