Barista has a few areas where images are scaled and cropped automatically. This can prove a bit tricky to get your images to look how you want, unless you know the minimum size requirements. As long as your images meet these requirements, you shouldn't have any trouble adding images to your website.
When placing an image, you should test your site at different sizes (e.g., on a mobile device or in a narrow browser window) as page widths adjust dynamically depending on the available width of the browser. Wondering why ideal sizes are so large? The larger size is used for high resolution displays, e.g., retina displays.
Slideshow Block
The slideshow block is designed to showcase landscape-oriented images, not portrait. Ideally, images for the full-width slideshow placed in the "Featured" region are at least 2016 x 850 pixels, but at minimum 1008 x 425 pixels. Images for the "homepage style" slideshow are ideally at least 1224 x 816 pixels, but at minimum 612 x 408 pixels. Other slideshow placements (full-width slideshows placed in the "Content" region) are also ideally at least 1224 x 816 pixels, but at minimum 612 x 408 pixels.
Directory / Person Page
Headshots should be 400 x 534 pixels at minimum. It's ok to use 200 x 267 pixels, but those images may not look good on retina displays.
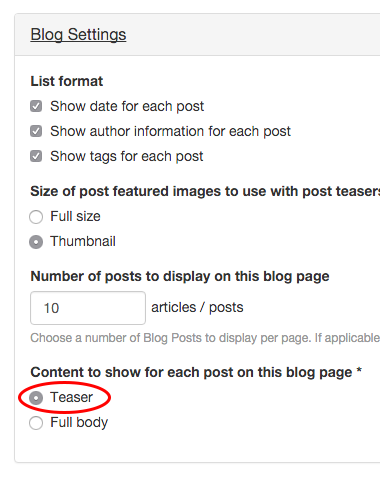
Blog / Blog Post
Thumbnail Image The thumbnail image field has a fixed width of 150 pixels. This means if you upload an image larger than 150 pixels wide, it will shrink your image down to 150 pixels wide. If you upload an image smaller than 150 pixels wide, it will increase your image to 150 pixels wide and your image will appear blurry. It's best to use an image 150 pixels wide or larger. The length of your image can vary and will be adjusted to the width proportionally.
Post Image The size of your image will be adjusted proportionally depending on if you have sidebar blocks showing on your post pages or not. For posts that show sidebar blocks, the post image will have a fixed width of 184 pixels. For posts that do not show sidebar blocks, the post image will have a fixed width of 296 pixels. For best image results, upload the largest size and it will be adjusted proportionally. The length of your image can vary.
Tips and Tricks for Adjusting Images
Editing Images Outside of Barista
If you have access to photo editing software, like Photoshop, it may be a good idea to adjust your images before you upload them into Barista. (If you don't have Photoshop, try searching the web for free alternatives for photo editing.)
It's always good to keep the proportion of images in mind. For example, if you have a large headshot image, you could crop the image to the exact size needed (400 x 534 pixels). By cropping the image beforehand, you reduce the background area and can focus more on the actual headshot. If you uploaded a larger headshot, Barista will reduce the image, therefore keeping the large background area and it will make the headshot look smaller.
Adding White Space or a Clear Background
If you don't like the set sizes of some areas, you can work around them by adding white space or a clear background to your image before you upload it into Barista. For example, thumbnail images for the blog template are set at 150 pixels wide. If you feel the images at this size are too big, you can use the trick of adding white space to make them appear smaller.
First, you'll need to edit your image outside of Barista. Decrease the size of your original image to the size you prefer for the thumbnail. Next add white space (or better, a clear background) around your image that makes the image 150 pixels wide. (In Photoshop, this is done by increasing the canvas area.) Now when you upload that image into Barista, it won't get enlarged because it meets the minimum requirement, but will appear smaller due to the white space you added.
PRO TIP Never increase the size of an image or upload an image that is smaller than the minimum requirement. Doing either of these will blow up the image and make it appear blurry and pixelated. If you absolutely can't get a larger image, try the white space trick mentioned above so Barista won't automatically enlarge the image.